
In a world turned upside down by COVID-19, many schools are now closed, and some are offering virtual learning. The question I get most often is:
How do we determine which tech tool to use for online schooling?
When thinking about the tsunami of ed-tech recommendations shared lately on social media, less is more. You don’t need more tech tools; just do more with the tools you have.
This is not an article about which virtual school tech tools to use. It’s about how to assign a job for each of the tech tools in your repertoire. By starting with your learning objectives and considering which tech tool to use to help students access that objective, you can learn to filter the myriad of tech tools in your toolbelt into a workable framework.
To prevent myself and my students from drowning in the rising flood of tech options, I group the technology I use into 4 buckets.
- Content – comprehensible input
- Create – comprehensible output
- Collaborate – student / teacher conferences
- Curate – disseminating instruction
If the tool serves a particular purpose effectively, I consider that bucket close-to-full, so I do not need to collect more tech tools. When a more user-friendly tool becomes available, the previous one is swapped out.
Programs that can fit into one or more of the buckets have a permanent spot in my toolkit. Pre-virtual learning, I only used about six tech tools on a regular basis. Now that I’m entering my 9th week of virtual school, I have added just two more.
The bucket method has helped me filter my tech integration into only what I really need.

Content: What tech tools help make content accessible?
The goal of these apps is to establish comprehensible input so students can learn content. Tech apps in the Content bucket help students learn concepts, master content-specific vocabulary words, and arrive at the essential understandings of a unit.
I only use a few tools to teach content, and the key is that I use them together as a system with the following steps:
- Google Slides: I start off by creating a presentation that contains limited text and lots of visuals.
- Edpuzzle: I find a video on Youtube that teaches the unit’s content. I use Edpuzzle to embed prompts at key moments in the video. Students are to answer the prompt to proceed to the next part of the video. I embed the Edpuzzle assignment link into the Google Slides, which students have access to.
- Screencastify: I then present the Google Slides, share my screen and enable my camera to record my face as I record the instructions. This helps make it feel like I am actually there with students. Screencastify can be integrated with Google Classroom or Youtube. Just share the link with students to watch the video.
Create: What tech tools can help students display their thinking?
The goal of these tools is to support comprehensible output. The tech tools in the Create bucket help students engage with content and demonstrate their understanding. A creation tool turns students’ thoughts into typed texts and visuals so both they and I can see their ideas. Creation tools help you gather formative data and structure formative assessments.
Though I am listing four creation tool options, I mainly use Google Slides.
- Google Slides: I use Google Slides to collect students’ writing. Since Google Slides is a presentation creation platform, it allows students to insert photos, icons, and shapes that all can be easily manipulated with greater ease than in Google Doc.
- Book Creator: We assigned this as a publishing platform for students’ narratives. Students paste in their text written in Google Doc, insert relevant images, and even record themselves reading the text aloud. Students can even read each other’s published books.
- Buncee: If you’re looking for an even more visually appealing creation tool than Google Slides, consider Buncee. It’s like the RuPaul version of Google Slides. It’s an award-winning platform where teachers and students can collaborate to create a presentation. Buncee comes with an extensive library of icons and stickers. Some stickers are even animated.
- Piktochart / Canva: If you want students to create professional-looking infographics, consider Piktochart or Canva. They come with lots of icons and templates to support the design process. For older students, you can use the graph function to visualize data.
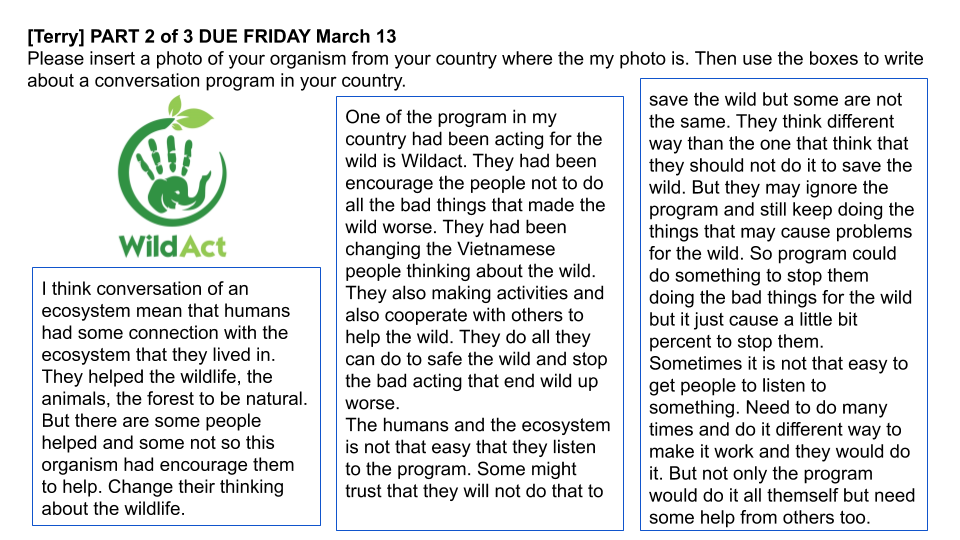
An example of a slide created by one of my students to capture her writing.
Collaborate: What tech tools help teachers and students talk to each other?
Virtual learning cannot consist only of asynchronously watching countless teaching videos. Students need to have time to interact with other students and their teachers. This can be facilitated by online conference platforms. The goal of these collaboration tools is to foster live interaction where students are using their speaking and listening skills. Conferencing restores some of the human element back to virtual schooling.
For the first eight weeks of virtual schooling, I mainly sent instructional videos to students, and we met in small groups weekly. However, the small group meetings were designed more to guide instruction and less to promote student collaboration.
As I move to the final quarter of the school year, which will also be online, I will be structuring learning as collaborative experiences where students come together in groups of two or three to:
- clarify ideas around a concept
- build on ideas of others
- fill in knowledge gaps
I hope that this shift from disseminating information to facilitating collaboration will engage students and more resemble in-person schooling. The collaboration tools I use are:
- Google Meet: I can schedule a meeting, assign particular students to the meeting, enable live closed caption, set notifications, and allow students to share their screen.
- Zoom: Zoom has the same features as Google Meet. They also both allow for meetings to be recorded and provide a chat feature. Zoom’s distinguishing features are its virtual hand raise option and the ability to view all participants’ faces at the same time. The corporate version of Zoom also allows for the teacher to facilitate small breakout rooms.
- Comments on Google Suite: All Google apps allow users to leave comments, which is another form of collaboration.
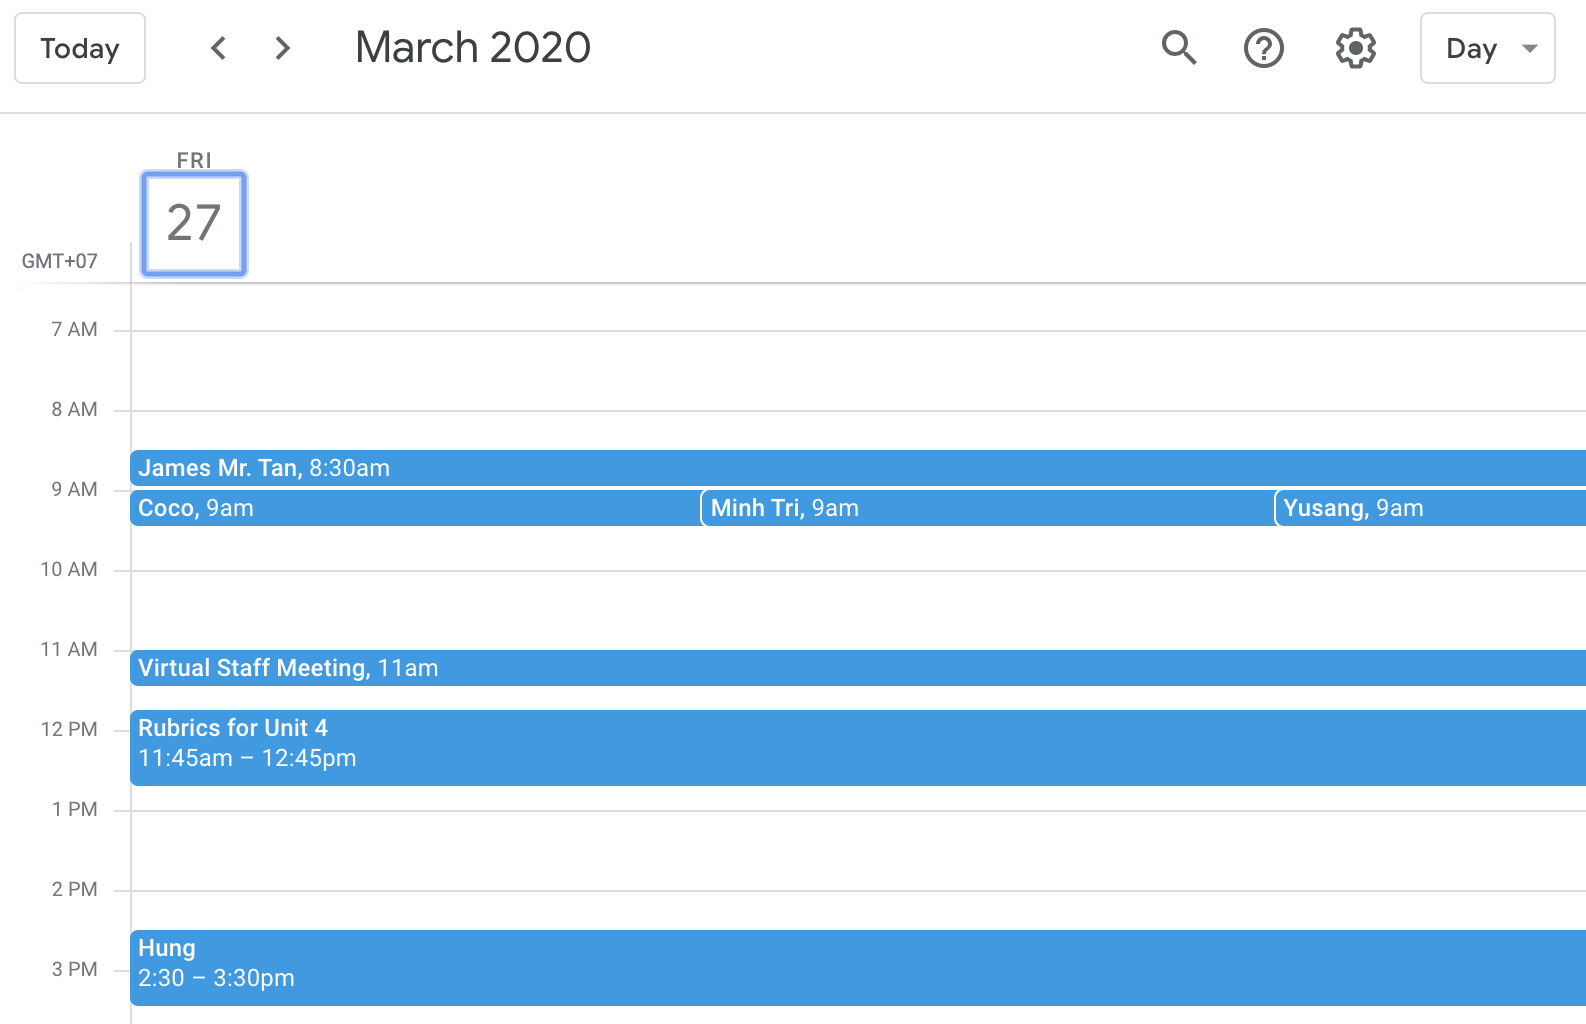
This is an example of how I integrate opportunities to collaborate with teachers and students through online conferences.
Curate: What tech tools help manage assignments and messages in one central area?
Curation tools are like virtual mailboxes where teachers and students send work and leave comments for each other. Some curation tools are known as learning management systems. They centralize assignments for students and teachers.
Options for curation tools are:
- Google Classroom: This is a life-saver of a platform where teachers can send Google Suite products such as Google Slides, Docs, Form, Sheets, and Drawings to students with the option of view only, comment only, or make a copy. It’s like a virtual copier. It also organizes work for students in one central location.
- Seesaw: This can be used as a virtual portfolio where students display work that can be shared with families.
- “Week-at-a-Glance”: Each grade in our elementary school now creates a Google Doc that describes the work students have to do each day for an entire week. This helps prevent students from drowning in a flood of links because one document holds all the required links for that week. This demanded extensive planning ahead of time, but families and students alike appreciated this document.

An actual example of a Week-at-a-Glance document from one of my co-teachers.
In closing
Did you notice that I only use a handful of tech tools to facilitate virtual school? That’s because I doubled up on Google Suite products. For example, Google Slides can be used to teach content, foster collaboration, and be a canvas for capturing thinking.
I encourage you to find ways to optimize each of the tech tools you are familiar with. When we optimize technology this way, we maintain our sanity in addition to that of our students. In these insane times, maybe that’s what we need the most.
Afterthought: Filling your buckets
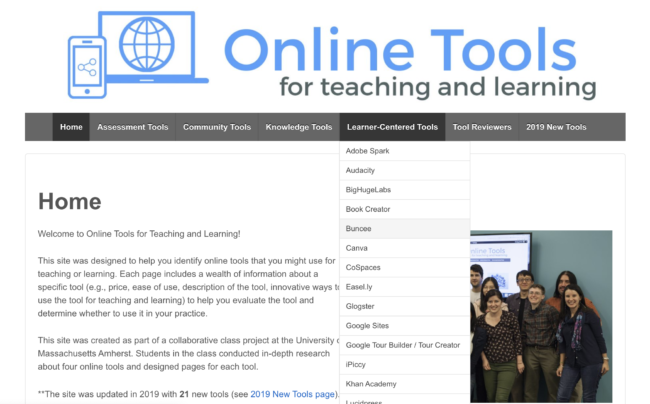
I found the website Online Tools for Teaching and Learning by the University of Massachusetts, and I love it! They have categorized lots of tech tools into their own “buckets”. They even go a step further to explain how they rated the platform.
It’s worth looking into if you’re looking for tools to add to your toolkit. Just make sure to identify which bucket it should go into.
Parris, H., Estrada, L., & Honigsfeld, A. (2016). ESL frontiers: Using technology to enhance instruction for English learners. Thousand Oaks, CA: Corwin Press.